Look here: AURO OtoSys IM100 remote diagnostics is confirmed to work perfectly
What is remote diagnosis:
Remote diagnostics is the act of diagnosing a given symptom, issue or problem from a distance. Instead of the subject being co-located with the person or system done diagnostics, with remote diagnostics the subjects can be separated by physical distance
What is auto diagnostic via Auro IM100:
The Diagnostics application can retrieve ECU information, read & erase DTCs, and view live data. The Diagnostics application can access the electronic control unit (ECU) for various vehicle control systems, including engine, transmission, antilock brake system (ABS), airbag system (SRS).
There are two options available when accessing the Diagnosis section:
1.Auto Scan – starts auto scanning for all the available systems on the vehicle.
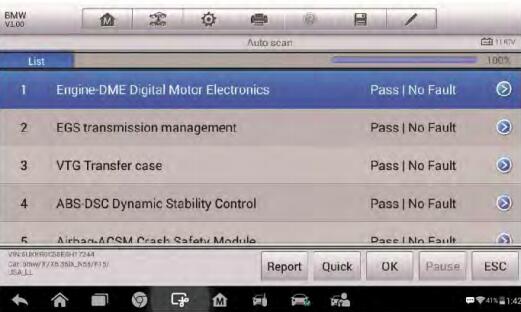
2.Control Units – displays a selection menu of all available control units of the test vehicle.
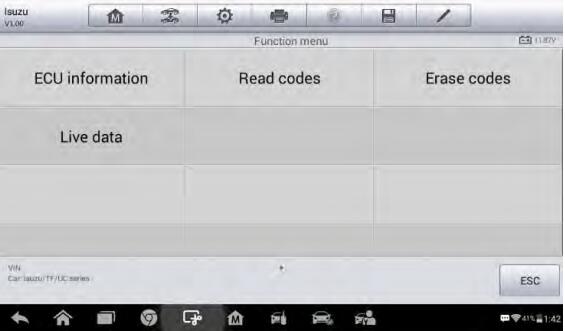
ECU Information: provides the retrieved ECU information in detail. An information screen opens upon selection.
Read Codes: displays detailed information of DTC records retrieved from the test vehicle’s ECU.
Erase Codes: erases DTC records and other data from the test vehicle’s ECU.
Live Data: retrieves and displays live data and parameters from the test vehicle’s ECU.
How to do diagnostic tests using Auro OtoSys IM100:
1. Establish communication with the test vehicle.
2. Identify the test vehicle by selecting from the menu options.
3. Select the Diagnosis section.
4. Locate the required system for testing by Auto Scan or through menu driven selections in Control Units.
5. Select the desired diagnostic function from the Function Menu.
How to have an access to obd2/eobd diagnostic function in OBD2 Scanner IM100
1. Tap the Diagnostics application button from the OtoSys Job Menu. The Vehicle Menu displays.
2. Tap the EOBD button. There are two options to establish communication with the vehicle.
Auto Scan – when this option is selected the diagnostic tool attempts to establish communication using each protocol in order to determine which one the vehicle is broadcasting on.
Protocol – when this option is selected the screen opens a submenu of various protocols. A communication protocol is a standardized way of data communication between an ECM and a diagnostic tool. Global OBD may use several different communication protocols.
3. Select a specific protocol under the Protocol option. Wait for the OBD II Diagnostic Menu to appear.
4. Select a function option to continue.
DTC & FFD:
When this function is selected, the screen displays a list of Stored Codes and Pending Codes. When the Freeze Frame data of certain DTCs are available for viewing, a snowflake button will display on the right side of the DTC item.
I/M Readiness:
This function is used to check the readiness of the monitoring system. It is an excellent function to use prior to having a vehicle inspected for compliance to a state emissions program.
Live Data:
This function displays the real time PID data from ECU. Displayed data includes analog inputs and outputs, digital inputs and outputs, and system status information broadcast on the vehicle data stream.
O2 Sensor Monitor:
This option allows retrieval and viewing of O2 sensor monitor test results for the most recently performed tests from the vehicle’s on-board computer.
On-Board Monitor:
This option allows you to view the results of On-Board Monitor tests. The tests are useful after servicing or after erasing a vehicle’s control module memory.
Component Test:
This service enables bi-directional control of the ECM so that the diagnostic tool is able to transmit control commands to operate the vehicle systems. This function is useful in determining whether the ECM responds to a command well.
Vehicle Information:
The option displays the vehicle identification number (VIN), the calibration identification, and the calibration verification number (CVN), and other information of the test vehicle.
Vehicle Status:
This item is used to check the current condition of the vehicle, including communication protocols of OBD II modules, retrieved codes amount, status of the Malfunction Indicator Light (MIL), and other additional information.
How to exit Auto Key Programmer Auro IM100 Diagnostics application:
1. From an active diagnostic screen, tap the Back or ESC functional button to exit a diagnostic session step-by-step.
2. Or tap the Vehicle Swap button on the diagnostics toolbar to return to the Vehicle Menu screen.
3. From the Vehicle Menu screen, tap the Home button on the top toolbar; or tap the Back button on the navigation bar at the bottom of the screen.
4. Or tap the Home button on the diagnostics toolbar to exit the application directly and go back to the OtoSys Job Menu.
Leave a Reply